ad

Showing posts with label Blogger 101. Show all posts

Tutorial: How to Remove Required Title from Blogger Sidebar Gadget

Time to learn a new Blogger trick!!

Although I rarely use the image gadget in Blogger, I recently had a client who ran into a very common problem that she needed help with. After helping her out, I decided that this topic would make a great beginner tutorial for all of you as well. 

Plus ALSO (in my best Junie B. voice), I am way overdue on posting a new Blogger tutorial for all of you.  Get ready to learn something new and super EASY!!

Title: How to Remove the Required Title from a Blogger Gadget
Level of Difficulty: Beginner/Easy 
Time: Less than 2 minutes!
NO CODING REQUIRED! (this may or may not be a lie....)

Have you ever tried to add an image gadget to your sidebar without a title... only to get this annoying error in Blogger... requiring you to include a title (see visual below)? 


Those of you not familiar with code or those of you that just don't want to mess with the blog template might have chosen to either add the stinkin' title to the image, or not add the image altogether. 

You might have even gotten clever and uploaded the image to Photobucket, grabbed the HTML image code and uploaded an HTML/Javascript Gadget instead. Of course, this will force you to work with code, but it will get the job done.... with some time and effort. 

Good for you for your quick thinking...but I have something even easier that will save you a great deal of time and effort, and won't require coding or an image hosting account. 

There is only ONE step in this tutorial!! 

The next time you want to upload an image to a Blogger image gadget WITHOUT being forced to add a title, simply, add the following text in the same place you would add the title text from within the gadget form... <!--> and click SAVE (see visual below). 


When I am all done, I end up with an image and...
LOOK...


WARNING: It is about to get GEEKY up in here!!

What did we just do?? 

Well friends, we just tricked the gadget into "thinking" there was a title, but in reality, we sent a coded message to not show the title text!!  I know, I know... I told you that there was no coding involved...I LIED!!! Technically, you did not have to open your blog template and add code or add CSS, but the text you added to the title is actually HTML...Hyper Text Markup Language... for those of you who fear the fact that you just used code!! ha!! 

Here is what the text you just added really means...that is... if you want to get a little Geeky with me for fun. 

I will attempt to break this down and explain this in the most basic way possible...

The angle brackets <  > (also known as inequality signs) "house" messages (tags and content) we want to send in HTML. The text between the angle brackets is typically referred to as a TAG name.  With HTML and CSS, we can communicate to web browsers and tell it how to display our content!! Pretty COOL stuff, huh?? 

Here is the breakdown of the HTML tag we typed as the title of our image gadget:

<   "ET PHONE HOME"   
The angle brackets open our communication with a web browser (just like dialing a number on a telephone) and let the web browser know what we want it to do or not do. When our code is written properly, the web browser determines how to display our content on the web based on the tags and content we communicated typed.

!  "Here Ye, Here Ye!"   
The exclamation point is typically followed by a declaration like, <!DOCTYPE html>, which tells the web browser what language we are using and how to display the content for that language. 

I am really trying hard to make this as simple as possible to understand...

The text that follows a declaration will determine the content type to the web browser. Basically, the exclamation point tells the web browser to pay attention.

-   "NOTHING, NADA, ZILTCH"
The two hyphen's we included told the web browser to display NOTHING as the title text. 

I created a little visual to help make it easier for you to remember what to type inside the gadget title form entry when you do NOT want a title to appear. 
Save it, Pin it, print it on a sticky note, or ignore it.... whatever will help you save time should you run into this problem in Blogger ever again.


I hope you all have enjoyed learning something new today!! Keep checking back periodically for more quick Blogger Tutorials!!  Thank you for stopping by & I would love to read your comments below!!


Using Google Web Fonts in Blogger: How to Change Blogger Post Title Font

Happy 1st of June!!! I have a fun tutorial for all of you to try out this summer...
Today I am going to show you how to customize the look of your post title text!


First things first... Let's pick out a Google Web font...
Below are a few of my favorite Google Web Fonts to use. I have included bold, handwritten, modern, traditional, fun, messy, cutsie, and cursive font choices below. These will give you a general idea of what these fonts will look like online. 
Now it is your turn!! Click on the image below to visit Google Web Fonts and choose a few favorite fonts. I suggest that you have a pad of paper  and a pen or pencil handy. Go through the list of fonts and write down the names of your favorite fonts. Write down about five font choices before following the directions below.
To make choosing a font a little less overwhelming, try typing your own text to display (see example below).
Choose one of the top tabs to change the way you see your text. You can choose to view a word, sentence, paragraph, or a poster. I prefer to use the poster option; however, you can not type your own text to display for this option. Choose what works best for you. 


Before you can change the font style of your post title, you must first add a little code to your blog template. Although, the directions I will give you are very simple, I highly suggest that you ALWAYS save a back-up copy of your blog template before making any changes. This way, if something goes awry, you can upload your saved back-up and save the day. 
1. Once you choose a font, open up your blog template. Click on the Template link (circled in green) and click on Edit HTML to open your Blogger Template. Once you have the template open. Place this page on "standby" and switch back to your Google Web Fonts Tab. 
2. Type in the name of the font you want to add to your blog and you will click on the arrow pointing to the right under the font name to grab the CSS.

3. Highlight and Copy the quick code on the following page

4. Switch back to your Blogger Template and locate <head> towards the very top of your template. 
5. Paste the code directly UNDER the <head> tag... 
As you can see in the image below, I already have several fonts installed on my blog template. I added the newest one underneath my previously installed fonts. 
Once you paste the code under the <head> tag you MUST add a closing tag to your new code in order to save your blog template. 
you will add  </link> directly after the code you pasted. DO NOT add any spaces (see the picture below)

SAVE your template.

None of the font styles on your blog will change yet. Now we need to find the post title CSS within your blog template and add some code to change the font style.

6. Click on the black arrow in your blog template next to the <skin> tags to expand your blog template.

7. On a PC, use CTRL + F to open the search bar within your blog template
search for the code  h3.post-title
The actual code may vary from one template to another, but you are looking for CSS titled, post-title within your blog template. 

8. Under the post-title CSS, look for font-family. If you do not have this under your post-title code, you will add it. I already have this code in my template, so I will just need to switch out the names of the font family and save my template. For those of you who do not have this within your code, you will need to add the line of code. If you do not have the line of code, copy and paste the line of code below directly above the } line. This is the closing tag, so your line of code will need to be above this tag. 
Change the font name to your own font where I have the font, satisfy, listed below. 

Make sure to copy all of the code below; including the semi-colon. If your font has two words in the name, do not add the plus symbol shown on the Google Web Font page. Just add a space between the words in the line of code below. Save your template and check your font!!

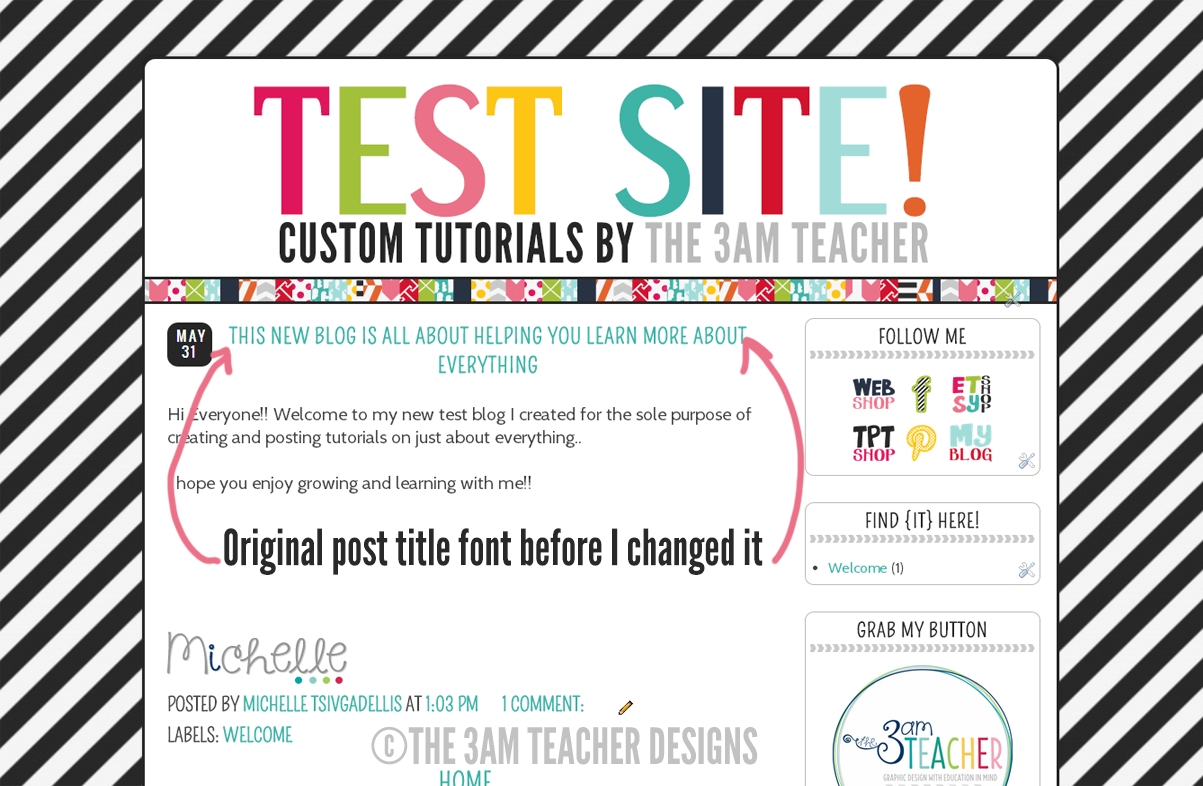
Here is what my post title looks like AFTER I changed the font family. I also made a few other custom changes, but I will show you how to do that in a later blog post. 

If, for some reason you do not have the post-title code in your blog template, follow the directions below to add the code yourself.

In Blogger, you will go to LAYOUT and click on the link at the top of the layout view titled, TEMPLATE DESIGNER. Once in the template designer, click on the advanced tab and scroll to the bottom titled, add CSS.
Copy and paste the following code into the box. Make sure to change the name of the font family to the name of the font you installed earlier into your template. 


Save your template and look at your beautiful post title!! If you do not like the font you chose, follow the directions above to add a different font. 

I hope this tutorial was fun and I would love to hear about your successes or struggles!!

Thank you so much for stopping by!!

ONE DAY ONLY DISCOUNT!! Get my No-Credit License for 50% off at my Etsy Shop!!! Discount has already been applied, so there is no checkout code needed!! This license will only be available to purchase for the month of June. After June, I will not longer offer this license in any of my shops...


New Custom Blog Designs and Time to Reserve a Spot for an Exclusive Custom Blog Design (Only 21 Spots left)!!

2014 has already started out promising and I just hope to continue to grow and expand my business. I never really set major New Year resolutions, but instead, I set continuous small goals and continue to challenge myself to learn more and improve my skills.

Here are two new Custom Blog Designs that I am very proud of!! I had the honor of working with Dr. Jean this past month and she is such a pleasure to work with. I can't even begin to describe how talented and generous this amazing woman is!! Although, you all probably already know how amazing she is!! Here is a before and after of her blog deisgn.

I am having a blast designing blogs and I am continually learning more about myself as an artist and as a designer.  Click on Dr. Jean's new button below to check out her new site!! 

And here is my VERY FIRST completed design for the new year!! Here is a before and after of Jen's new blog design.

If you want simple ideas and tips of ways to integrate technology into everyday lessons, then Tech with Jen is the blog to visit. Click on her new button below to check out Jen's new design!!
You can check out my latest designs by visiting my Portfolio Pinterest board. Click HERE to check out more of the amazing bloggers I have been honored to design for.

This year, I will only be accepting 24 New Clients for Custom Blog Designs. I realize that this may not seem like many, but I have many goals that I need to accomplish this year in order to accommodate my growing business and to ensure that I can continue to support my family.  I like that my designs are exclusive and very unique. I take great pride in my work and the best reward is to know that I am helping amazing bloggers establish their brands and helping them to blossom with their own businesses.

So far, I have 3 Bloggers signed up...

1. Jennifer with


2. Denise with
Sunny Days in Second

and...


3. Amy with


3 Amazing bloggers and 3 opportunities to create something unique.  These three blogs should be finished over the next couple of weeks, although, my designs do take a bit longer than typical custom blog designs. I start each design completely from scratch, illustrate and create all of my own designs and then provide my clients with a personalized design and all of the patterns and illustrations to use exclusively. I will never replicate a custom design because part of my goal is helping my clients establish their names and businesses in this fast-growing online market.

Because one of my New Year's goals is to finish my blog and website re-design, I will need to limit the amount of custom work I am taking on. I will accept 21 20 more custom blog design orders  this year and I would like to get everyone scheduled and planned ahead of time.

If you would like to book your spot for a custom blog design, here is what you will need to do and expect.

The process always begins by completing my Custom Blog Design Order form. The form is pretty intense with questions, however, please fill it out to the best of your ability. Some like to be very thorough and others like to leave things open, especially if they are unsure of what they are wanting for their design.

With me as your personal designer, there are very few limitations of what I am able to do. One of my limitations at this point is that I ONLY design Blogger blogs. I am not taking custom orders for WordPress blogs at this time.

Once I receive the form, I will go through the options and send you an email to review all of the options or answer any initial questions you might have. I will then set the start date and send you a Paypal invoice for the full amount. I do require that the design be paid in full before I being the process of designing your blog. It is your commitment to me as your designer and allows me to adequately support my family. Because my designs are a business investment, I understand that some may not have the money to pay for the entire design at once. In this case, I will set up a payment plan with clients upon request.

Once the payment is made, I then will schedule a time to chat with each client on the phone. I believe that having this human interactions is vital to me, as your designer. It is also important for you to hear and visualize me as a real human being on the other end. It helps me to really get an idea of what your business and personal needs are and what direction I will need to focus on for each design. Plus, I am a talker and I LOVE getting the opportunity to chat with everyone I design for!! Once the phone conference is set, then your date will be set in stone and the fun will begin on your scheduled date.

Some designs take a few days, while others take a few weeks. The amount of time I take on a design really depends on the amount of detail required for each design. I never rush the process and I create a test blog site for each client, which allows them to see the design elements come together in real time and in a web format. A blog design does not look the same in a screenshot from my design program as it will online.

 It is important to me that each client gets the opportunity to make  decisions based on what the blog will actually look like online, rather than forcing them to try and visualize this themselves. I am hired because I am the creative expert, so I do not want to ever place that responsibility or stress on any of my clients. I try to make the process fun and exciting, but I do expect that each client respect my own limitations and boundaries as well. My goal is to build a design that will reflect each client individually and meet both their personal and professional goals. This is much easier said than done and it takes a great deal of focused work hours to accomplish.

Once I have 12 New Clients signed up, I will close the form so that I can work on some personal business goals and not become overwhelmed with orders. My client list has been quickly growing and building and I enjoy getting the opportunity to work with so many unique people!!! My inspiration from each design is pulled and formed by each of my clients, so the end result is a synonymous mix of my art and my clients' vision. Investing in a custom blog design will be one the most important investments if you plan to create a name and a business for yourself. It is also a  tax write-off!

I hope to get an opportunity to work YOU!!!

If you would like to reserve a spot to hire me as your personal designer for an exclusive blog design, then click the image below to complete the form and hold your spot!! Again, once the remaining 21 spots are booked, the form will be inactive until next year.

Book Now and receive a Teachers Pay Teachers shop banner for free with your paid design!!!


NEW: Pre-Made Custom Blog Designs Now Available to Purchase!!! Meet Strawberry Bliss & Deliciously Red!!!

I AM SO EXCITED!!!!

I am getting ready to launch my website over the holidays, but in the meantime, I have a pre-made custom blog design available to order right now!!! I am so excited to show you the first one!!!

My Pre-made designs are PACKED with goodies you won't find any where else. You also have the assurance that every element and graphic is created my {ME} and you will not be required to purchase additional licences for the use of the elements in each design!!

I will only be selling 20 versions of each design to keep the design unique!

Get $50 off for a limited time! Purchase the available pre-made design(s) at a discounted rate of $125.00!!! That is a lot of bang for your buck!! Regular pricing will be $175 per design. Whether you plan to start an online business or a blog for personal use, these designs include everything you need to get started in style!! Custom color, font and style options are available for each pre-made design.

Check out my very first Pre-Made Designer Blog: Strawberry Bliss!! Click the image to see a LIVE preview!!


 photo 3am_SB2_zps0566e6bb.png

How to Build a Product for Teachers Pay Teachers: The Etiquette of Using Clipart and Fonts for Free and Paid Products on TpT


We live in an age of diversity and the ability to access millions of images, graphics, fonts, and other forms of digital art with a click of a button. With the rise of mass marketing and our digital relationships, finding free downloadable clipart, photos, and fonts is far easier than it used to be.

As a former teacher, I know how much has changed since I was in the classroom only a couple of years ago. There once was a time when we had to hunt people down to find something we needed, but now, we can sit at home in our pajamas and access thousands of resources within minutes.

However, these benefits do not come without a price. We do not have the freedom to use the images, clipart, and fonts we find on the web without permission. Here is something I wrote that you might want to recite to yourself.

For the purpose of this post, the word "it" refers to clipart, photos, fonts, and other digital resources found online. 

 If I did not create "it", then I need permission to use "it"!
This small quote will help you decide whether or not you should use a digital image or font in your TpT free or paid products.

Now onto some jargon...

What does this/that mean?
Common jargon found in many terms of use files for clipart and fonts explained.


Copyright is a form of protection grounded in the U.S. Constitution and granted by law for original works of authorship fixed in a tangible medium of expression. Copyright covers both published and unpublished works.

Now in English.... Copyright protects your work. Copyright laws, although in place to protect intellectual property and digital work (Digital Millennium Copyright Act ), can do nothing for you in a case of copyright infringement unless you can prove you are the original creator of the work in question. 

I am not going to explain in detail what steps to take to make sure your work is protected; however, I will tell you that you do NOT need to file or register your work to be protected. 

Click the links below to find out more information  pertaining to copyright:
1. What does copyright protect?
2. When is my work protected?
3. Do I have to register with your office to be protected?
4. Why should I register my work if copyright protection is automatic?
5. I’ve heard about a “poor man’s copyright.” What is it?
6. Is my copyright good in other countries?


 Those of you who create TpT products might feel a little comfort in knowing that when you publish your product online, a digital stamp or date of publication is created. That date can be used to determine the original creator if a dispute should arise.  

As a Teachers Pay Teachers Seller/ Online Business Owner, you need to know that the work of others is protected under the law.

Do not use, copy, re-sell, or post anything without permission.
 

Terms of Use: 
Think of terms of use as the permissions granted to you by the copyright owner. The artists of the clipart or fonts are offering something that you should treasure... permission to use their work to improve the quality of your own work. Always remember that there is a real person behind every image you use and every font you download. That person spends a great deal of time creating graphics/fonts to share with the world, but also runs a business. 

For myself, I must depend on my art and my talents to put food on the table and pay the bills. I am able to bless my family as well as fellow sellers who create amazing resources by making my art available on TpT and my other online stores. I am always honored when anyone uses my art to improve the quality of their product, however, I do expect for my hard work to be respected, protected, and attributed. 

Terms of use may vary from one artist to another. For instance, my terms of use do not apply to another artists' terms of use. You must read each artists' terms of use. Keep your files organized well, so you can easily find licensing information, logos, and/or links of the creator of the work you are using. This will help you easily add attribution pages to your products. 


Commercial Use
  for Clipart and Fonts: 
Refers to the use of ANYTHING (clipart, photos, fonts, reference materials, etc) that you plan to use in AnYTHING (web design, products, hard goods, digital scrapbooking, digital books, etc)  that generates an income. 

If you plan to use the clipart or font in a resource that you hope will generate an income for you, then you will need to make sure you have permission to do so. 

Although the term, commercial use, can be summarized as such (see above definition), this does not mean you are free to use the clipart and fonts however you would like to. I can't stress enough, the importance of making sure to READ the terms of use that is included with the clipart and fonts you are planning to use in your products and free resources. 

WHY??

Because... in order to use the clipart and/or fonts in products that will generate an income, the artist may have included specific guidelines that you MUST respect and follow. Remember, you are using work from another business owner in order to improve the quality of your own work. Both the artist and user must respect each other's businesses and hard work. 

Using images in products you sell without abiding by all of the terms stated by the artists' work you are choosing to use is called COPYRIGHT INFRINGEMENT. Copyright infringement can lead to a lawsuit and/or the loss of your online shop(s). In some cases, a lawsuit could include having to pay thousands of dollars or writing an embarrassing letter to all of your clients about your actions.

For this next part, I am only going to focus on the specifics of various restrictions in terms of using clipart and fonts in TpT products only.... there are many other terms and restrictions on commercial use clipart/fonts that pertain to other uses besides teaching materials. Please be very aware of those terms and restrictions if you plan on making hard goods or things to sell on Etsy with the art/fonts.

Topics to consider when choosing commercial use clipart:

1. Check to make sure an additional fee is not needed to use the clipart or fonts in your products. If additional fees are required, decide whether it is worth the business investment to improve your products. If it is, then pay up and make sure to give the artist lots of love. If you do not feel that the art is worth the investment, then find another artist. There are many talented people on TpT!!!

Please be sure not to insult an artist. I have read comments from various people complaining about the price of clipart or fonts and I am always saddened when I see this happen. The artist is running a business as well and you are hoping to profit from the artists' work. Do not insult someone's hard work by complaining about the price. If the price is too high for you, then find an affordable alternative. Purchasing clipart and fonts are important business investments that will greatly increase your revenue. Be blessed that there are artists willing to share their work at an affordable price. Publishers pay thousands of dollars for the images used in books, websites, and printed materials. If an artists' work is good, then paying a bit more will be worth it to the success of your business in the long run. PLUS ALSO (in my best Junie B voice), you are supporting creative and wonderful artists when you purchase high quality graphics and fonts... you are blessing someone while being blessed.... don't be stingy on your blessings.. haha

2. Limited printing or selling caps placed on commercial use terms. Some artists want additional fees if a seller plans to sell more than 1000 units of a product that contains their art. Remember, this is not unreasonable from the artists' standpoint, but you will need to decide if this is a term you're willing to abide by. Most sellers LOATH terms like these (hints to artists out there who might be just starting out). It requires that they keep track of the particular products that contain those images, track the quantity sold, and make sure to contact the artist to purchase additional license fees should their product become popular. 

As a former teacher: Ain't Nobody Got Time for Dat!

Possibly... the personal Meta-log of an artist... Wow, ______ is making lots of money from the $5.00 set they purchased from me... I need to monetize on this somehow. 

*Artists who do not sell teaching materials may not realize that, although the art improves the overall quality of a product, it is the content (not the art) that makes a product popular or not. 

Me: I would not even want to begin having to monitor this.... price includes commercial use license... for life... no matter how popular you get. And I hope everyone who uses my art does get popular... that is great for business!! haha!! I would not want to penalize success in any way. 

Well, I guess my response had a little bit of teacher and a little bit of artist in the mix...

3.  May not be used in Smartboard resources. Many artists prohibit their art from being used in Smartboard resources offered for free or placed up for sale. This is because there is no way to secure and protect their work from people who purchase those products. When someone downloads a purchased Smartboard file, the included clipart images are not secured and can be stolen and used by the buyer. This poses many problems for artists. The purchaser of the product did not pay for the art and is, most likely, unaware of the terms or copyright restrictions. When you purchase clipart or fonts, you hold the licence to use the art, but your buyers do not. If you love your artist(s), then make sure you protect their work and they will love you right back. Always email the artist if you are unsure about using the images. 

4. May NOT be used in FREE products. Yes, I have read this in many terms of use files. Many artists do not want clipart used in free resources for obvious reasons. Most free resources are not secured and therefore, the art is not protected. You do NOT have to right to use free clip art however you would like. Most times, the same terms of use that apply to purchased clipart and fonts, also applies to free downloads as well. Take the time to read the terms of use BEFORE you make a big purchase. This will save you the heartache of discovering that you can't use the images how you had planned to. You do NOT get refunds for digital purchases, so read before you buy. 

5. Images may not be used in blog posts. This one probably applies to every artist I know; including myself. Please DO NOT upload copyrighted images in your posts. Even if the images are used innocently to brighten a post, you are giving those images away to every person who visits your blog....for free... DON'T DO IT.... It is like using profanity with copyrighted images and it hurts the artist and his/her business. There are ways to add images to a blog post without compromising the art through code or with a program. 

6. The artist who sells copyrighted and trademarked images... BIG NO NO!!! Characters in books and in movies are copyrighted and protected under the United States Copyright Law. Just because they can draw it and sell it, doesn't mean you are protected. YOU know better!! No matter how tempting, do NOT purchase clip art containing images of copyrighted art and characters to use in products you plan to sell. Creating quality resources takes a great deal of time and planning! These materials don't create themselves... If you choose to purchase these clipart sets, you put yourself AND your buyers at risk!! 

As an artist offering commercial use of images I create, I have a duty to protect myself and my buyers from possible copyright infringement lawsuits. Just stay away from these sets. There are alternatives to the copyrighted images that will work just as well with your resources... Instead of purchasing a set of clipart titled, "Pete the Cat", and includes replicas of the book characters in the set... instead, find a set of cute cats images with shoes that are not replicas of the book character. You will get the same result in your resource without having to worry whether or not you will be asked to take the product down from your shop. 

Important NOTE to TpT Sellers: If you receive a cease and desist letter through TpT, and are found "guilty" of copyright infringement,  then you will  also receive a "strike" against your shop. After three strikes, your shop can and will most likely be shut down. Read the TPT Terms of Service for more information. Taking risks, such as purchasing clipart of copyrighted images, is not worth the investment in the longevity and success of your business.

JUST SAY NO to COPYRIGHTED IMAGES
..... Friends help friends say NO, by sharing the knowledge!!!

7. Attribution Required for personal and commercial use. Most of the artists on TPT do not require that you purchase an extra license for commercial use, but that you do include an attribution in your file where the images are used. Most artists include a link and/or an image you can include in your file for the credit/attribution. You must follow the terms of each artist. Some artist's require that a link be placed on EVERY page the clipart is used, while others only require that you place the credit somewhere in your file. 

If you create a one-page printable resource that you plan to post on your blog or in your shop, make sure to include the credit/attribution when the terms of use require you to do so. If you ever have an issue, just contact the artist. We don't bite and are more than willing (in most cases) to accommodate your needs. I am always flattered when someone contacts me to ask about my terms of use, because it shows that the person contacting me values my art and what I do (or that is what I tell myself anyway). 

8. NOT to be used with "other" clipart images.  I have only ever read this once, and I can't even remember where I saw it. Some artist's might not want their images used with images from competing artists. They want to be the movie star of your resource..(don't we all..haha). In these circumstances, make sure that you can create a complete resource using the images provided by that artist or company. Decide whether or not you want to invest. Remember, there are plenty of creatives in the sea!!! Many of whom will even create custom art for a product you are creating!! Find a few favorite artists and spoil them.... we are like the maintenance staff at the school (but with a fancier title). In a jam, we can whip up a side of whatever is in your imagination... just like the maintenance person you spoil to death will help save you time by changing your trash bin for you, or helping you move a few things, or fix a light that is out. The artist's are the gems to having a successful TpT business.. and I am not just saying that because I am an artist... 

BUT I am a gem... just ask my husband... there can only be one of me in this world!! 

I also create teaching materials and I know how important it is to have quality art and attractive layouts and covers. You catch their eyes with what's on the outside, but you gain their hearts when they fall in love with what's on the inside.... If an artist has your heart, you will have "her" passion and "her" help when you need it. 

9. There are no terms included. RUN!! Just kidding... just go on a hunt to contact the artist. If you like the font or the art enough, you will hunt him/her down. NEVER assume that you can use clipart or fonts in your products when you can't find the terms. Sometimes, many artists will offer single freebies on their blogs (like I do) or elsewhere and the link to the terms in the post, but not on the image. Just do a little digging and you will find what you need. If you can't find the artist or the terms, then toss out that image. You DO NOT have permission until you have permission... 

10. Last, but not least: IMAGES MUST be secured and/or flattened. This is often required for personal and commercial use.
I saved this term/topic for last becasue it is the MOST important term/topic to follow.... let me say this once more...

THIS IS THE MOST IMPORTANT TERM TO FOLLOW... 

 Securing the images efficiently will benefit both you and the artist. You will benefit, because you will continue to create unique resources. If you give everyone who buys your products free clipart (by failing to secure the images), they will create similar resources and not have to pay for the images. They might also take your idea and improve it and surpass you in sales. Don't hurt your own business by making it easy for sellers to copy your work. If they want to create a resource with similar images... make them invest their own money into a business, instead of mooching freebies from your work. 

You might not even be aware that the images you are using are not secure. Protect the artists' work as you would your own work. 

If you convert a file to a PDF... and that is all.... that PDF is NOT SECURED!!!! Let me write this in another way...

Converting a file to a PDF does NOT secure the file!!!

Do not upload products with copyrighted images in a Word or PowerPoint document - they are not secured and you are not following the terms of use. 

The copyrighted images must be flattened or secured with a password; disabling the ability to right click on images and copy or save them from within your product. If you can right click and copy/save the image, then you have NOT secured the clipart. 

Here are a few tutorials and resources that might help you learn how to secure copyrighted clipart in your TpT products.


2. How to group images in Microsoft Word. This will show you how to group/flatten images so they are not clickable when converted to a PDF.


11. Yes, there is one more thing. All terms of use include statements to prevent users from re-selling, distributing, altering, or using images for mass production (like t-shirts, cards, and other hard goods that complete with the artists business). This includes many things I have seen many sellers do on TPT. 

You can NOT arrange clipart images to make a frame to sell, or sell single pages as printable clipart for people to cut out, or create coloring books using clipart to sell.  You are selling the someone else's work when you do this. Just as you wouldn't want someone purchasing your file, putting their name on it, and re-selling it as their own, neither do the artists want to see only their images in a file with your name on it. It is still not okay to do this even if you give credit to the artist. 

Test yourself with this one sentence I include in my own Terms of Use for my graphics:

IF YOU REMOVE ALL OF THE CLIP ART AND THERE IS NOTHING LEFT TO SELL, THEN YOU ARE IN VIOLATION OF COPYRIGHT INFRINGEMENT... 

If, however, you remove all of the clipart and you still have an original resource that could be sold, you get an A PLUS from me!!! If you include pages within your resource that includes printable cards with the clipart, this is alright. As long as the entire file is not printable clipart pages. Again, if you are not sure, ask the artist....

Example:
Vocabulary cards with clipart and text :YES 
Vocabulary cards with clipart and nothing else: NO


PERSONAL USE: Things you create for yourself and your personal classroom ONLY. 

You may not use personal use clipart images in free resources, shared files, or products for sale.
Personal use means PERSONAL USE. Only the person who purchased the clipart or fonts may use the clipart or fonts for things made for him/herself.... that's you...

There is not much to be said about personal use. So long as whatever you create is only for you and/or your own classroom, then you are abiding by the terms of use. 


Resources


Library of Congress: Copyright & Primary Sources (an interactive video to explain the use of copyrighted materials as references in work)


Do you want more amazing tips on how to make your Teacher’s Pay Teachers products sell, sell, sell?
Click any link below


   How to make a TpT cover from Teacher to the Core   How to write amazing explanations and allign your products to the Common Core so that your units are teacher friendly and sell like crazy-from Growing Firsties
Do you want your TpT products to sell sell sell- Swap out fonts and clip art to make your units more appealing    The term TOU can be confusing-click for an easy explantion   How to make a credits page that will make your life easier and can be used on all your products.

From One Teacherprenuer to Another: My Blogger Beginning & Tips for Beginners

Hi Everyone!!

Today, I am devoting this post to tell you a little bit about how I became a blogger/teacherprenuer, offer some helpful tools and tips to new teacher bloggers, and plant a little helping seed in those of you who desire to start a new teacher blog.

I receive countless emails from new bloggers and others who want to become a blogger, trying to pick my brain for tips about blogging as they begin on their own journey. Some of the questions I receive… and I quote:

1. “How did you become so rich and famous blogging?” Author unknown (and possibly made up) haha

2. How do I get more followers?
3. How do I make a blog button?
4. How do I get more followers?
5. What is the best way to connect with other bloggers?
6. How do I get more followers?
7. How do I re-size an image using HTML code?
8. How do I get more followers?
9. Can you tell me how to draw? 
10. How do I get more followers?
11. How do I make a cute header for my blog?
12. How do I get more Followers?
13. How do I add social media buttons to my sidebar?
14. How do I get more followers?
15. Will you design and create products for TpT that I can sell?
16. How do I get more followers?
17. Should I have a Twitter account?
18. How do I get more followers?
19. Will blogging help increase my TpT sales?
20. How do I get more followers?

Although I am far from rich and famous, starting a blog had a {HUGE} positive impact on my life when I needed it the very most. And like most of the questions I receive, I too was clueless as to how to get started. 


I knew NOTHING about blogging – I know – Shocker, right?

How I became a blogger…

In 20ll, I resigned from teaching (after spending thousands on a duel Master’s Degree) because I was desperate for a change of pace. For years, I had worked full-time, juggled two kids and their activities full time, went to school full time at nights, and devoted my extra time to grading papers, planning, conferences, professional development, barely talking to my own children, a strict “hi & bye” relationship with my husband, and still barely making enough to put food on the table. 
A few years before started working on my Master’s Degree, my husband decided to start his own Heating and Air Conditioning business. Needless to say, I am sure that my children will have some sour thoughts about our lack of commitment to them. Actually, I don’t want to say that it was a lack of commitment. My drive to make a better life for my children just blinded me from the fact that they needed me more than anything else….

I created all of our forms, PDF’s, proposal designs, logos, t-shirts designs, business cards and the website (which we are changing now) and add that with the work-load of the Master’s program and teaching full-time, I was getting about 2-3 hours (at the most) of sleep every night. I even continued working this schedule for three weeks with walking pneumonia. 

I was pretty sick and feverish on and off for those three weeks, but I kept on working and thinking that I would eventually get over it!! BOY was I ever wrong… I worked through that pneumonia until I could literally not get up one morning. I could barely talk and all I could think about was how I would ever get a sub in time. I was so sick that my own husband had to call in sick for me – bad – I know….. luckily, I had become very close with the “boss” and she was more than helpful!! My husband took me in to the ER and after taking one glance at me, the sweet nurse in the waiting room bumped me to the front of the line. I must have looked terrible!! Because I chose not to slow down when my body was giving me all of the signals, I ended up being out of work for 2 WEEKS!!! That is a LONG time when you are a teacher!!! A good lesson for all of you this year!! TAKE THE DAY… or you might end up losing two weeks!!

My point in the story is that I worked myself to complete exhaustion. While I was working on my Master’s Degree I was offered a Special Education position for 8th grade. I felt terrible having to turn down the position, but I had m=several reasons for doing so. One, the demands of Special Education teachers are beyond insanity… yes, I used the correct word… beyond INSANITY!!! Second, I am a reading and writing specialist. I love teaching reading and writing at any age and I am DANG good at it… I am not bragging… I am just stating facts – and that is a fact…. MATH on the other hand…. has no business being in my job description. I ENVY those who are great at teaching math because it is my biggest weakness!! I don’t “hate” math, I am just not very good at it and I don’t feel like I have any business teaching the subject!! Accepting the 8th grade Special Education position would require that I teach math at the 8th grade level….. Those kids need help the most and they need someone at their best in all subject areas….I would be doing those kids a disservice! Third, I needed a break. My marriage was breaking at the seams, my past had come to bite me in the “behind”, and I was beginning to feel the effects ware heavily on my mind, spirit, and body. 

Making the choice to resign was very difficult. I loved teaching and I loved being in that environment!! I intended to make this post short and sweet, so let me get to the good part fairly quick… After a couple of months at home, I went crazy!!! I am not the content, happy-go-lucky stay at home type of mom…. I have accepted the fact that I am self-motivated and hot-wired to work… I became very closed up and suffered from depression after only a few months of being at home. I was not prepared for the change of pace and/or prepared to deal with the aftermath of problems I had to face after having ignored those problems in the past by staying busy.. Insanely busy!!!

Our HVAC business had slowed down dramatically and I was not bringing in an income. We lost our beautiful luxury truck – only owing $8,000 more to have it paid off!! We could barely afford groceries and I was so blessed by the people in our church that helped us with food. We had never struggled to that extent before and neither had our children. It was very difficult for all of us. We did not have a vehicle and if it weren’t for the loyalty of one of our employees, we would not have been able to keep the HVAC business running. God is forever gracious and good, I tell ya!! We were walking to the grocery store to get groceries and we were unable to take our kids anywhere for several months. We were barely making our minimum monthly bills. 


I decided that I HAD to do something to bring in some money… Something from home…

This is the pivotal moment where having a TpT store made all the difference…
I started a TpT store in 2008, but I did not have the time to really put effort into making it a lucrative business. One morning I woke up and read an article about a teacher who and made 1 MILLION dollars selling products on TPT. I thought, I could do that… and I have time now…

I quickly sat down to review my TpT store and make some attainable goals for myself to work towards.
At the time I first sat down and created my goals, here were my stats from May 2008 to October of 2011… (Remember, I had about 3 things in my store and I had not visited the site in over two years)

Date: October 6th, 2011
Store Name: My own name
Followers: 19 (as in the ones and tens place….)
Sold Items: 16
Rating: (here is where it gets truly embarrassing) – 3.6!!!

My goals:
1. Remove outdated products
2. Create new products
3. Get my rating up
4. Market??
5. How am I going to get more sales… and followers???

I am telling you all this because we all have to start somewhere. I began doing a little research before creating anything new…

I began improving and adding products to my shop. I also discovered the forums!!! I had never visited the forums before this point!! I began reading tips and connecting with others right away. 

By the end of December, I recorded my TpT stats once again:

Store name: Still my own name – no change there yet
Followers: 18 (WOO HOO…up one)
Sold items: 94 (again… woo hoo)
Rating: 3.7… the averages are getting better
Earnings for that quarter: $267.71!!! Wow!! Until that point, I had made a total of about $60.00 on TpT… This was very motivating for me. 

Even though there was money present in my Paypal account, I did not have a business account at that time and did not have the Paypal Credit card to pull funds out. It was exciting and frustrating all at the same time. Here, I had money that I could use to buy food, but I could not pull the money out. For that first quarter, I ordered things like shampoo and other bathroom and kitchen stuff through Amazon. Where there’s a will, there is always a way…

I can’t tell you how excited I was to be able to buy simple necessities online with the money I had earned.
I quickly set up a Paypal business account, verified my bank to lift the spending and receiving limits and ordered my fancy Smanshy Paypal business card. I felt so sophisticated…hahaha

Even though I was happy that my efforts were beginning to pay off, I was a little discouraged at how long it was taking, compared to how much work I was putting in. I then read something in the forums about starting a blog!!?? Someone mentioned that having a blog was essential and directly connected to sales on TpT. 

So what did I do with that new information you ask?? I set new goals…or one new goal…

Start a blog… sounds easy enough, right? WRONG!!
The first week after I started my blog, I still had no followers (aside from the three followers I created myself using my kids and my husband) hahaha… I did not know how to connect at that time and I truly was not moving towards my goals at a rate that would make any sort of a difference… I needed a plan… and fast!! My first few posts were absolutely pathetic and I was terrified by the idea that I was talking to everyone… and no one at the same time. 

I turned to Google search. I can’t recall my specific search; however, I can recall the blog post that changed my life and got me headed in the right direction…

I found a blog post by a small-town blogger (tehehe) named Erica Bohrer. You may or may not have heard of her… tehehe… 

Now, you might be asking yourself why I didn’t go to Deanna Jump’s blog and copy everything she did to become a millionaire and try to contact her to get with the “in” crowd?

Let me answer that for you…. I did NOT know anything about blogging or its significance related to sales. Even more so, I did not want to contact anyone because I was completely embarrassed by my own store stats… I was focused on the task at hand… how to improve, grow… and feed my family… Thirdly and most importantly… it is ILLEGAL to copy someone else’s work… and… who could ever take pride in that??

There was one particular post by Erica Bohrer titled, Questions Answered… that made all the difference!!It was a short and sweet (unlike mine at this point) little post she did to answer some questions that she had received about blogging and other things. One of those Q & A topics included: How did you get your blog all fancy… and How do I get followers on my blog (DING - DING – DING) – the lights immediately came on and I was sucked in…

I already knew a lot about computers, coding and design, but I knew nothing about blogging. I knew I had to start a blog, but I didn’t know how to go about connecting with other bloggers. Now, what I am about to tell you next is a little bit embarrassing…

I read this little excerpt and followed EVERY step to its fullest…

Question 5:
"How do I get followers on my blog?"
1. Make your blog look fancy (see above).
2. Give away lots of free files. Click {here} to see my freebies.
3. Comment on other blogs. Click {here} to see Ladybug's tutorial on leaving a direct link.
4. Post pictures or sample images and Pin yourself! Yes, I know it is like patting yourself ont he back, but it works! Click {here} to follow me on Pinterest.
5. Host a giveaway. Have people follow you for an entry.
6. Make a facebook fan page and comment on other facebook fan pages. Then post links to your blog posts on your fan page.
7. Make it easier for people to comment on your blog. Click {here} for What the Teacher Want's tutorial.

Let me walk you through my thought process while reading this…

1. Well, I already have those skills…. CHECK!! Wait…. is what I have considered fancy? Is my blog too dark? Will everyone hate the name? Is the image of the “working” American girl under copyright protection? Am I legal? 

Luckily for Erica, I did not have the nerve to email her with my rant of questions… mostly because I am a prideful woman…. to a fault…

2. GIVE STUFF AWAY FOR FREE?? Okay!! CHECK! 
*Quick note to beginners - this should be done in balance and not the way I took it…. I was giving everything away for free and realized that I was gaining followers, but losing time and money.

3. Comment? What do I say?

4. Pin?? What is a pin and how much is this going to cost me?? hahaha

5. I need a break….

6. Facebook fan page… fun… check!!

7. CHECK!! I did that as soon as I started the blog… those robot thingys are ANNOYING!!!

Even though I was feeling a bit overwhelmed, I decided that I had to stick with it and I was excited that I had some new goals in front of me. I began keeping track of my blog stats along with my TpT stats on a weekly basis to determine what I needed to improve and what I needed to throw out!!

Here are my blog stats from January 22nd, 2012:
Followers: 11 (I AM POP-U-LAR)
Visits: 1, 358 (wait… does this mean that 1, 347 people that visited my blog chose not to follow??.. This can’t be good news…)

From February 17th, 2012:
Followers: 99
Visits: 6, 980

As you can see, sometimes people need more of an incentive to make that initial commitment to follow your blog. Especially if you are not that interesting (which I was not). I continued following Erica’s advice and learned how to effectively connect with other bloggers, host giveaways, offer freebies, and include quality content. 

These steps take time and dedication, so don’t give up on yourselves. Just keep moving forward and working towards small, attainable goals, and you will get there in time. 

By the end of the first quarter in 2012 (January 1- March 30st), diligently working hard every day…. 

Updated Stats: First Quarter (Jan. 1- march 30st 2012):

TpT Stats: 
Followers: 419
Products Sold in that quarter: 630
Earnings: $3, 355.10

Blog Stats:
Followers: 532
Visits: 42,760

As you can see from the stats… my efforts paid off in a big way!! It was not ONE MILLION DOLLARS big, but that money paid bills, groceries, clothes and more for one month. Break down the total earnings into three months and I was still only making a little more than $1,000 a month. Not much by any means, but it was a lot for me and a HUGE blessing for my family when we really needed it. By the second quarter, I made a little bit more, but I was able to purchase a used car for $3,000!!! We had been using a car of a friend of ours after winter came and it began to rain. I just couldn't stand to watch my kids have to walk to school in the rain even one more day. Since then, I have continued to set goals for myself. I believe that setting goals… ATTAINABLE goals... are very important. I never set goals for earning a certain amount of money. Slow times on TpT can’t be controlled. I did; however, find new ways to generate extra income to supplement and grow. 

I have invested quite a lot of money into my business and I continue to grow in small increments. Sometimes, the payouts are larger and sometimes they are smaller. Either way, I continue to work as hard as I possibly can. I can’t bear to see my children hungry. 

I am truly thankful for the amount of support and advice I have received from other bloggers along the way. I am also pretty excited and impressed by the level of talent of my circle of blogger/ Facebook friends I am the closest to. They are absolutely AMAZING and continue to motivate me in ways that I never thought possible. 

Before I give you some tips and resources, I want to give a special thanks to Erica Bohrer, who unknowingly (until now), changed my life with one simple, yet thoughtful little post. If I had not come across that post that day (I read through all of her posts that day.. actually..haha), I am not sure that my mindset would have changed. I was in a pretty dark place and her post peeked through the hundreds of search results like a light at the end of a tunnel. We may have lost our house if I hadn't started at that exact time… towards a goal. 

If you have not had the pleasure of visiting her blog, please take a moment of silence while I choke.... hahaha Just kidding... you can click her cute button and take a visit for yourself....


I only hope that I can impact a new blogger in the same way!! So here’s to a new adventure and setting new goals. Now for the part you have all been waiting for… 

Tips for new Bloggers:
1. Make sure to have an organized and attractive blog. If it is in your budget, get a custom designed blog that will help you stand out and create a brand for yourself. 
Exclusive Custom Blog Designs: I will not be available this September, but I am accepting Custom Blog Design orders now for October-December. You can click the link to complete a form to reserve a spot: CLICK HERE 

I will have pre-made design choices available in October as well…

If getting a Custom Blog Design by me is not in your budget, there are many free, pre-made templates you can choose from. These designs are free to everyone, so there might be other people with your same design; however, it is something to get your blog “fancy” for the time being. The Cutest Blog on the Block has several free options to choose from & they are ALL super cute!!
http://thecutestblogontheblock.com/category/backgrounds/blogger
2. Don’t be afraid of social media – those will be your best marketing opportunities and ways to find bloggers to connect with. 

My Top Social Media Suggestions for newbies:

*Facebook fan page (this is different from your personal Facebook page)
*A Pinterest Account. I encourage you to join collaborative Pinterest boards, as they are very helpful, but make sure to join boards that will help you work towards your goals. Also, make sure to follow the board guidelines, so you don’t get yourself kicked off. I have never been removed from a collaborative board; however, I know those who have… it is never fun, so make sure you know the posting rules and Pinterest Etiquette. 
*A Gmail account for your business only. 

Twitter is a great choice as well, but can be overwhelming for many new bloggers. If this is the case, then add Twitter as a goal for the future and stick with Facebook and Pinterest for the time being.

Here is a great video by Charity Preston to help you get started using Pinterest if you are unfamilair with it.

Getting Started with Pinterest with Charity Preston: 

Pinterest Etiquette Resource Links:
http://www.momcomm.com/2012/09/5-things-not-to-re-pin-on-pinterest/
http://www.prdaily.com/Main/Articles/10_essentials_of_Pinterest_etiquette_14758.aspx#
http://dotcomplicated.co/content/2013/05/pinterest-etiquette/

3. Visit the TpT Forum every now and again to connect and learn!!
http://www.teacherspayteachers.com/forum
4. Don’t whine or complain about not having enough sales or many followers. No one is likely to help a whiner, so take in all of the advice and tips you can, be diligent in your work ethics, and BE PATIENT… this does not happen overnight. 

5. Offer quality freebies. I once received a question from someone I helped learn a few things and she asked: “I have a few old sets that are not great compared to what I am doing now, I am thinking about making these freebies on TpT. What do you think?”

If you have also had this thought cross your mind – ERASE IT!!! If you offer your worst as a freebie, people are less likely to trust that your quality resources are worth paying for. I am not telling you to create a resource with over 70 clip art images or 100 pages of activities and offer that for free…. by all means…. refrain from doing that!! Create small freebies, but put forth your best work. What is the point of creating anything if you are not going to do your very best? 

Some things take me several months to complete… but I do not rush the process. Don’t rush just to have the most products. Some of the very top sellers have fewer than 100 product listings!

I have seen many clip artists adding one image in a million colors onto their shop and then bragging that they have X amount of product listings… big deal…. I can assure you that anything that is up there can most likely be created by anyone and will be created by more people. Create unique products that reflect your talent and set you a part from the crowd. DO not worry about the number of product listings you have, but rather the quality of the listings you have. There are so many people taking every opportunity to copy and the less unique a product is, the easier it is to duplicate… don’t be afraid to take your time. You will be glad you did in the long run.

6. Join linky’s, but make sure your blog does not become a staple for giveaways only… Trust me, it is difficult to turn down the opportunity to join, but saying no is sometimes necessary for your own sanity…. If you join too many all at one time, then keeping up with all of them will be very difficult. It is more meaningful to put forth your effort to a few than a bunch that you will have no time to post about. I have been there… trust me….

7. Have fun meeting people from around the world!!
I have gained such a great deal of knowledge and respect for bloggers all over the world! I started this to help support my family, but gained a HUGE family in the process. The friendships I have built and the people I have met has truly become what I look forward to. I am never amazed by the talent and love of the bloggers that I have connected with and I am blessed by the life-long friendships I have made. One of my long-term goals is to pack a back and visit all of my close bloggers friends - what an adventure that will be!!! 

8. Get used to the idea that you could be a bit of a celebrity “in the blogging world anyway”… hahaha

Funny Story: When I purchased my car, my husband surprised me by ordering a custom license place: 3AMTCH. One afternoon, I was a little early to pick up my son (not normal behavior for me) and I was waiting in the car for the bell to ring. I pulled out my phone to get a little FB fix when I noticed someone staring at me from the passenger side window…. It was not someone I knew, not someone I had ever seen before, but there she was… standing at the window with a big smile on her face and waving…. I rolled down the window, hoping that I didn’t forget that I knew her from somewhere or thinking she might need some help with something… and right away she asked me, “Are you The 3AM Teacher?!!!” Her legs began to wobble just a bit… sort of like a cute kindergartener wanting to show you something they made… I told her I was as my face began to turn beat RED… possibly hot pink… not quite sure about that, but I did feel the heat rise heavily in my cheeks. Then she said, “I LOVE YOUR BLOG AND YOUR ART - I can’t wait to tell my friends that I met you!!” 

I had no idea how to take that, but I did thank her while trying not to cry…. how sweet and strange that experience was….I did not think I was a big deal, but she did… then I thought… I would probably feel the same if I spotted some of the bloggers I admire in person!!! I was truly embarrassed, yet completely blessed. My point… don’t ignore someone staring at you through your car window when your blog gets more out there… you might have a fan… not one who likes your looks or how famous you are, but someone who genuinely admires your talent and love for others…. there could be no better complement than that!!!

Thank you for visiting - now go on and start your own adventure!!!!

Click the links below to check out some great tips from fellow bloggers and more.  Don’t try to do it all at once, but take small steps in the right direction and you will be blessed for your efforts and diligence!!! I will continue to add more links as I go through my files....


Related Posts Plugin for WordPress, Blogger...