ad

Showing posts with label Tickle Me Tech. Show all posts

Photoshop Tech Tip: How to Reduce Photoshop PSD Files w/out Using Compression Tools

As a gal with nearly a million design files to keep track of, it is vital that I do whatever possible to save hard drive space. I keep all of my files on external hard drives and backed up on my OneDrive account, but I hate the thought of so many unused files taking up tons of space. Many of my design files can reach beyond over 100MB, so finding little tricks to save space can be exciting.

While working on a file, and completely by coincidence, I discovered a way to reduce the size of my psd files without doing anything, but adding a layer within the file!! I had no idea I could do this, so I figured some of you might also benefit from this little gem of a tip I discovered.

For the tip below, I am going to use the exercise files I created for the TpT Conference in Vegas this past July. I did not have time to share these slides during either one of the sessions, so I thought I would share the tip right here with all of you. 

STEP #1: OPEN THE PSD FILE YOU WANT TO REDUCE


STEP #2: ADD A NEW LAYER ABOVE ALL OF THE OTHER LAYERS IN THE FILE

In Windows, use the shortcut key (as seen in the image below) to add a new layer. 
For Mac users:  SHIFT + CMD + N

You may also choose to use the tools menu at the top {Layer > New} or follow the arrows below to take advantage of the mini layer tool menu.


STEP #3: FILL THE NEW LAYER WITH A WHITE FILL USING THE BUCKET TOOL  (see below)

STEP #4: SAVE THE FILE!
Once you save the file, go back to the folder where you have it saved and highlight the file to see how much space you just saved!! VOILA!! 

If you were not able to attend my session at the TpT Conference in Vegas this past July - do not worry friends!! For a limited time, I am offering the digital version of the session (including all of the bonus materials) from my website for only $25.00. The tutorial is for artists already familiar with using Photoshop, but want to learn how to improve their line art.

Click on any of the images to learn more about what's included in the Digital Version of my TpT Session. Stay tuned for my video workshop series and pre-registration pricing coming soon!! 

Have a happy Wednesday everyone & thank you for learning with me! I would love to learn about some of the tips you "accidentally" stumbled upon as well. Leave your comments below and I look forward to chatting with you!


Tutorial: How to Remove Required Title from Blogger Sidebar Gadget

Time to learn a new Blogger trick!!

Although I rarely use the image gadget in Blogger, I recently had a client who ran into a very common problem that she needed help with. After helping her out, I decided that this topic would make a great beginner tutorial for all of you as well. 

Plus ALSO (in my best Junie B. voice), I am way overdue on posting a new Blogger tutorial for all of you.  Get ready to learn something new and super EASY!!

Title: How to Remove the Required Title from a Blogger Gadget
Level of Difficulty: Beginner/Easy 
Time: Less than 2 minutes!
NO CODING REQUIRED! (this may or may not be a lie....)

Have you ever tried to add an image gadget to your sidebar without a title... only to get this annoying error in Blogger... requiring you to include a title (see visual below)? 


Those of you not familiar with code or those of you that just don't want to mess with the blog template might have chosen to either add the stinkin' title to the image, or not add the image altogether. 

You might have even gotten clever and uploaded the image to Photobucket, grabbed the HTML image code and uploaded an HTML/Javascript Gadget instead. Of course, this will force you to work with code, but it will get the job done.... with some time and effort. 

Good for you for your quick thinking...but I have something even easier that will save you a great deal of time and effort, and won't require coding or an image hosting account. 

There is only ONE step in this tutorial!! 

The next time you want to upload an image to a Blogger image gadget WITHOUT being forced to add a title, simply, add the following text in the same place you would add the title text from within the gadget form... <!--> and click SAVE (see visual below). 


When I am all done, I end up with an image and...
LOOK...


WARNING: It is about to get GEEKY up in here!!

What did we just do?? 

Well friends, we just tricked the gadget into "thinking" there was a title, but in reality, we sent a coded message to not show the title text!!  I know, I know... I told you that there was no coding involved...I LIED!!! Technically, you did not have to open your blog template and add code or add CSS, but the text you added to the title is actually HTML...Hyper Text Markup Language... for those of you who fear the fact that you just used code!! ha!! 

Here is what the text you just added really means...that is... if you want to get a little Geeky with me for fun. 

I will attempt to break this down and explain this in the most basic way possible...

The angle brackets <  > (also known as inequality signs) "house" messages (tags and content) we want to send in HTML. The text between the angle brackets is typically referred to as a TAG name.  With HTML and CSS, we can communicate to web browsers and tell it how to display our content!! Pretty COOL stuff, huh?? 

Here is the breakdown of the HTML tag we typed as the title of our image gadget:

<   "ET PHONE HOME"   
The angle brackets open our communication with a web browser (just like dialing a number on a telephone) and let the web browser know what we want it to do or not do. When our code is written properly, the web browser determines how to display our content on the web based on the tags and content we communicated typed.

!  "Here Ye, Here Ye!"   
The exclamation point is typically followed by a declaration like, <!DOCTYPE html>, which tells the web browser what language we are using and how to display the content for that language. 

I am really trying hard to make this as simple as possible to understand...

The text that follows a declaration will determine the content type to the web browser. Basically, the exclamation point tells the web browser to pay attention.

-   "NOTHING, NADA, ZILTCH"
The two hyphen's we included told the web browser to display NOTHING as the title text. 

I created a little visual to help make it easier for you to remember what to type inside the gadget title form entry when you do NOT want a title to appear. 
Save it, Pin it, print it on a sticky note, or ignore it.... whatever will help you save time should you run into this problem in Blogger ever again.


I hope you all have enjoyed learning something new today!! Keep checking back periodically for more quick Blogger Tutorials!!  Thank you for stopping by & I would love to read your comments below!!


Using Google Web Fonts in Blogger: How to Change Blogger Post Title Font

Happy 1st of June!!! I have a fun tutorial for all of you to try out this summer...
Today I am going to show you how to customize the look of your post title text!


First things first... Let's pick out a Google Web font...
Below are a few of my favorite Google Web Fonts to use. I have included bold, handwritten, modern, traditional, fun, messy, cutsie, and cursive font choices below. These will give you a general idea of what these fonts will look like online. 
Now it is your turn!! Click on the image below to visit Google Web Fonts and choose a few favorite fonts. I suggest that you have a pad of paper  and a pen or pencil handy. Go through the list of fonts and write down the names of your favorite fonts. Write down about five font choices before following the directions below.
To make choosing a font a little less overwhelming, try typing your own text to display (see example below).
Choose one of the top tabs to change the way you see your text. You can choose to view a word, sentence, paragraph, or a poster. I prefer to use the poster option; however, you can not type your own text to display for this option. Choose what works best for you. 


Before you can change the font style of your post title, you must first add a little code to your blog template. Although, the directions I will give you are very simple, I highly suggest that you ALWAYS save a back-up copy of your blog template before making any changes. This way, if something goes awry, you can upload your saved back-up and save the day. 
1. Once you choose a font, open up your blog template. Click on the Template link (circled in green) and click on Edit HTML to open your Blogger Template. Once you have the template open. Place this page on "standby" and switch back to your Google Web Fonts Tab. 
2. Type in the name of the font you want to add to your blog and you will click on the arrow pointing to the right under the font name to grab the CSS.

3. Highlight and Copy the quick code on the following page

4. Switch back to your Blogger Template and locate <head> towards the very top of your template. 
5. Paste the code directly UNDER the <head> tag... 
As you can see in the image below, I already have several fonts installed on my blog template. I added the newest one underneath my previously installed fonts. 
Once you paste the code under the <head> tag you MUST add a closing tag to your new code in order to save your blog template. 
you will add  </link> directly after the code you pasted. DO NOT add any spaces (see the picture below)

SAVE your template.

None of the font styles on your blog will change yet. Now we need to find the post title CSS within your blog template and add some code to change the font style.

6. Click on the black arrow in your blog template next to the <skin> tags to expand your blog template.

7. On a PC, use CTRL + F to open the search bar within your blog template
search for the code  h3.post-title
The actual code may vary from one template to another, but you are looking for CSS titled, post-title within your blog template. 

8. Under the post-title CSS, look for font-family. If you do not have this under your post-title code, you will add it. I already have this code in my template, so I will just need to switch out the names of the font family and save my template. For those of you who do not have this within your code, you will need to add the line of code. If you do not have the line of code, copy and paste the line of code below directly above the } line. This is the closing tag, so your line of code will need to be above this tag. 
Change the font name to your own font where I have the font, satisfy, listed below. 

Make sure to copy all of the code below; including the semi-colon. If your font has two words in the name, do not add the plus symbol shown on the Google Web Font page. Just add a space between the words in the line of code below. Save your template and check your font!!

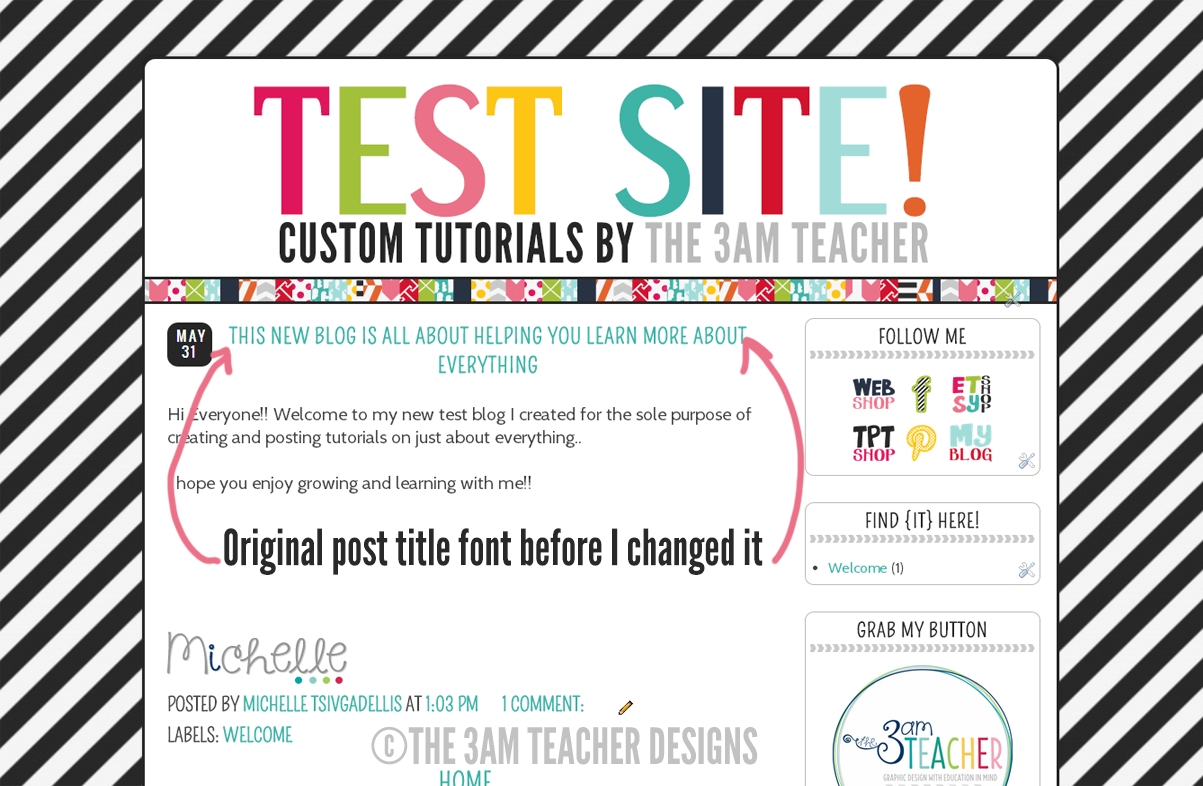
Here is what my post title looks like AFTER I changed the font family. I also made a few other custom changes, but I will show you how to do that in a later blog post. 

If, for some reason you do not have the post-title code in your blog template, follow the directions below to add the code yourself.

In Blogger, you will go to LAYOUT and click on the link at the top of the layout view titled, TEMPLATE DESIGNER. Once in the template designer, click on the advanced tab and scroll to the bottom titled, add CSS.
Copy and paste the following code into the box. Make sure to change the name of the font family to the name of the font you installed earlier into your template. 


Save your template and look at your beautiful post title!! If you do not like the font you chose, follow the directions above to add a different font. 

I hope this tutorial was fun and I would love to hear about your successes or struggles!!

Thank you so much for stopping by!!

ONE DAY ONLY DISCOUNT!! Get my No-Credit License for 50% off at my Etsy Shop!!! Discount has already been applied, so there is no checkout code needed!! This license will only be available to purchase for the month of June. After June, I will not longer offer this license in any of my shops...


Information about Copyright & Free Clipart Sites Offering Instant Downloads

Hi Everyone!!

I am writing a post because I received a Google notification about a site that was offering my clipart images as free downloads directly from their site. My goal with this post is to help make caution you about sites like these - as there are probably hundreds or even thousands out there - and to show you how you too can set up to receive Google notifications for information posted about you when it is published online.

Below is a screenshot of the notification I received in my inbox. I would not have received a notification had the guilty site not mentioned my name in the title. When I visited the site, I found that even more of my images were being offered as free digital downloads directly from the site and did not even include my name.  I will include the site address at the end of this post for those of you who would like to check to see if your art is also being given away for free.


Because the site is very difficult to search through. I conducted an advanced Google search to look specifically for the images that were hosted on the site.

To conduct an advanced search through Google go to: http://www.google.com/advanced_image_search

This is the screen that you will see once you are on the advanced search options

I then completed the fields for "all these words" and "site or domain"
Once those two fields were filled in, I clicked on the blue button titled, Advanced Search. Once I did, all of the images from the site appeared in the browser. If you scroll over an image, you will see that the image is linked to the site that I typed into the advanced search options above.


The image below shows the address where the image has been published. The image itself clearly does not belong to the site. I used Phillip Martin's image because he is very popular and quite well-known among teachers. I added the text on the screenshot. 

Because this site was offering free images from artists I am quite familiar with, I decided to notify a few of the artists about the site.

I then send a cease and desist letter to the site through their "contact us" link for all of the images I found that were mine. Because the site did not include any information about who owns the site, I decided to look up the domain information to try and identify the site owner in order to contact the person directly.

To do this, I used the domain look-up tool at the whois server. Click the image below to visit the site. It is a good one to bookmark and save. (http://whois.domaintools.com/)
I typed in the domain of the site I wanted to look up and I was given a lot of information pertaining to the site. The information you will need to pay close attention to is:
  • Registrant Name:
  • Address 1:
  • Address 2:
  • Country:
  • Phone Numbers:
  • Time Zone:
  • Registrant Email Address:
  • Domain Booked on:
  • Domain Expires on:
  • Name Server 1:
  • Name Server 2:
  • IP Address:
When the information was generated by the site, I noticed something strange about the details. The site owner's name and personal information was missing!! Instead, there was a company called, WHOIS Guard, Inc listed whenever there should have been information pertaining to the owner of the domain. Most might have given up, thinking that because the owner of the domain has protected his/her personal information, that nothing could be done.... WRONG....


You can contact the site protecting the information directly. I looked up WhoisGuard, inc and eventually found the following link http://suespammers.net/tag/whoisguard-review/. It took me less than a minute to find a way to contact this company.

I clicked on the "contact" link located at the top of the page and completed the form. I included as much information as possible, but failed to include the actual link to the site I was wanting them to look into. I did this to ensure that the company would contact me back and ask. I figured that if they did not email me to ask me for the site address I was referring to, then I would need to take further action elsewhere.

No need.. they responded to my message two hours after I submitted it. They requested the site address. I not only included the site address, but I also included all of the domain information I found on the site. I also included a list of the artists and/or companies I contacted to let them know that the site was offering instant downloads of their images for free from their site, and mostly without a link or credit to the artist of the image.

Some include:
Microsoft.com
Phillip Gary Martin
Scrappin' Doodles

and many more from Teachers Pay Teachers. Some of the clipart being offered could be found on the web for free and other items were paid clipart sets.

This afternoon I received another email from them stating that their company does not actually host the site. They did include the information of the company that is currently hosting the site. I have yet to contact this company, but I will do so before the day is over. If you are also wanting to report this site, please use the following contact information and include the information listed below in your email to them:

Name: Digital Ocean

Click the image below to visit their contact page to open a ticket or to email them with your concerns about the domain listed at the bottom of this post.
You will need to locate the domain address at the bottom of this post and include the following information with your message about the domain:

Domain: _______________________
 IP = 162.243.65.203

[ Informations about 162.243.65.203 ]

IP range : 162.243.0.0 - 162.243.255.255
Network name : DIGITALOCEAN-7
Infos : Digital Ocean, Inc.
Infos : 270 Lafayette St
Infos : Suite 1105
Infos : New York
Infos : NY
Infos : 10012
Country : United States (US)
Abuse E-mail : abuse@digitalocean.com


You might also choose to contact the abuse email at the same time. That email is included in the information I just listed above.

For those of you who may have already downloaded images from the site OR are still thinking about downloading images from the site, there are some very important things you should be aware.

FIRST: If a website is offering FREE downloads of various images without including a fee or license information, chances are, they are violating copyright and you should not proceed to download anything from the site. Instead, immediately report the site as copyright infringement or notify familiar artists they their work is being offered from the site and include the link.

Most artists require that anyone using the images in free or paid products and/or resources include a copyright link and credit within the file. If you choose to download images from a site like this, that offers no information about the owner or copyright about the image, then you also are violating the copyright of that artists' work. If you can not find copyright information about the images, then there is no way for you to comply with the terms of use of that artist if you use the image in a free or paid resource.

Please do NOT download anything from this site or sites like it. Value the hard work of the original artist and your own integrity by refusing to bring traffic or contributing to the site by downloading the images.

If you would like to receive Google Alerts for things related to your site or images is posted on the web, follow the directions below:

Go to www.google.com/alerts or click the image below

Type the word, title or name that you would like to receive notifications for in the space provided next to the field titled, Search query. It is best to use only one word or title at a time. You can create several alerts.
Choose the options and type your email address at the bottom. Click on the button titled, "Create Alert" once you have completed the form and follow any other prompted directions to complete the process. You might need to log into your Google account or you might be asked whether you want to receive alerts through your phone. 

Because I absolutely refuse to include a link to this site, I have included an image with the domain name. You can type the site address manually if you wish to visit the site.

I will continue to update all of you on the progress and information pertaining to the progress of this issue. 
Thank you very much for visiting and I hope you gained a little more knowledge about copyright infringement and how to report copyright infringement online.  

I would love to read your thoughts, input, or information you might be able to add to this... we can never have too much knowledge!!


A Before & After: A Sneak Peek Into My Custom Blog Design Process


Even though I am super proud of my latest custom blog design, I always feel weird about posting the finished image because I don't want to seem arrogant. I do, however, want to share the work I complete because this is... after all.. how I support my family...

I thought it would be fun for you all to get a little peek into the process and approach I took for my latest design project. 

I do not always take the same steps when I approach each new custom blog design project. My methods vary, but I do spend a great deal of time doing research on every client before I begin putting together an idea collage for each design. 

Here is how it all begins...

Step #1: Print Custom Blog Design Order Form
A client completes my Custom Blog Design Order form and pays in full for the design. Once a form has been submitted, I receive a notification through email. 
Below are a couple of helpful links for those of you thinking about investing in a custom blog design.


Designer Tip:
I use Wufoo forms to create and organize the forms I need to keep my business running smoothly. At $29.00 a month, it is well worth the price. Wufoo is a web application that allows users to create customization forms. You must have a pro account to add payment options to your forms. Click the image below to find out more. 


Once I am logged into my Wufoo account, I can see all of the forms I have created. If there is a new entree, a number will appear in red under the title of the form. Once I hover over the title, a tool menu appears and I can choose to see the entries, edit, view, and/or choose from several other options. To print the form, I click on the entries link and locate the name of the person who submitted a custom blog design order form. Once I click on a name, all of the information appears in the top portion of the screen. Due to private and sensitive data, I did not include a screenshot of a completed form below.

Step #2: Create a Client Folder (Digital & Hard Copy)
I use simple, multi-colored file folders and sticker labels for my client file folder hard copies. 
I store the folders in a simple paper tray and place them in order by months; starting with the earliest month on the top. This way, I can just pull the next folder in the stack.
Step #3: Email the client to confirm a start date
I purchased an ugly standard desk calendar to use specifically for custom blog design orders. Because I scheduled custom blog designs for the year, I was able to complete most of the calendar for the year. The calendar hangs on my wall behind my desk and keeps me on top of my schedule. When I receive a new order, I check for the most recent available dates before emailing the client. Once the client agrees on a start date, I explain the process and let him/her know that I will send an email to schedule a phone conference closer to the start date of their design.

Step #4: The Phone Conference
Although a bit scary at times, I believe that a phone conference is important to follow through with as a designer. Talking on the phone allows me to connect with each client and get a better sense of the direction and purpose of each design. I take notes during the conferences and I find that much of what the client originally wrote in the form is not actually the direction they really want for their design. This is why the phone conference is vital to the foundation of this process. Speaking to each client on the phone also allows the client to place a real person on my end. 

Here is a blurry (intentional) picture of the custom blog design client folder of the design I will be showing you. I use the conference to get clarity on color choices, font choices, purpose and goals for the design as related to a business or personal blog, and to write down anything else that might be important as I begin putting together ideas for the design. I always have the folder open while I am working on a client's design, so I don't have to try and search for the information.
Step #5 Research & Inspiration
Most times, I immediately get ideas for a design and will begin doing rough sketches to get my ideas flowing. The sketches are VERY rough and I typically just play around with ideas while they are fresh in my mind.

Other times, I search elsewhere for inspiration, which is what I did for the following design. Darlene wasn't sure what she wanted for a design, but she did know what color scheme she wanted to start with. Since the first thing that comes to mind is fruit when I think of bright citrus colors, I wanted to get a little inspiration before I began. Darlene wanted to give her blog a new title and a brighter look. I did not want to go with "food" themes even though her title is The ELA Buffet, and could easily go in that direction. Most bloggers now are wanting a more professional appearance on their blogs and are trying to stray far away from the "scrapbook" looks... I am hired to get to know my client and create, in essence, a brand/identity for their online presence. Nothing I come up with is pre-made or ready to go, which can make the process a little tricky at times. This is why Pinterest has become my very best friend for inspiration...

I make a strong point to not look for inspiration from other blog designs and instead, I get inspiration from interior design, color swatches, pictures, and anything else un-related to graphic design to spark some ideas. The reason I do not want to look at other design work for inspiration is because I want my designs to look and be original. Many times, clients will send me images from other blog designs they like. Although I allow this, I really do not like clients sending me pictures of other blog designs. There is no way to have an original design if one is trying to piece together elements they love from a variety of designs they have seen. This never works out and is often a big headache as I try to create a design with particular elements that do not really go well together. I actually prefer that clients trust me enough to come up with a design based on the completed form and our conversation. When a client wants to take control over the process and is not sure what he/she wants, it adds a great deal of work and pressure for the designer. 

Below are the two images I used to pull inspiration for this design... (both found on Pinterest)
I REALLY loved how the black and white stripes complemented the citrus colors without pulling away from the overall theme. I was certain I wanted to use that concept within this design. 

#6 The Idea Collage

This is the part of the process that typically takes up the majority of the time. I spend a great deal of time creating patterns and a background, and making sure the background works on a test site before sending the design preview to a client. I also choose a font and colors that complement the overall theme, purpose, and personality of the design. Each font has its own personality and choosing a perfect font is often a major challenge. 

Every client is different...
When I am given control over the design by a client, I am able to see the design as a whole as I am putting elements together. I am able to send over a complete design preview for these clients, which makes the process much quicker. 

For clients that like to be in full control, but are often unsure what they really want, I will only work on one element at a time. Once that element is approved, I will move on to the next element. Because these clients are unable to see the design as a whole when they are giving me specifications to work with, they often end up wanting to go back and make more changes as the design begins to take shape. 

This is why it is very important to make sure you trust your designer and allow him/her to listen to your needs and create something for you. 

Designer Tip: Make sure to have very clear guidelines when you begin working with clients. Make sure you have included fees for excessive revisions and don't be afraid to require a fee when you have made several changes and the client is requesting more changes after already approving an element. I know this is often very difficult to do, but this is a business and your time is valuable. I have made this mistake more than I would like to admit and I end up calculating my hours- only to find I have made just pennies per hour. Prevent this early on and if your client values you and your work, he/she will be happy to pay the extra fees for excessive changes. Always keep track of the amount of time you invest in each design. This will help you determine whether you are meeting your financial and business goals.

Here is the initial idea design preview I sent to Darlene. As you can see below, I pulled quite a bit from the photos above. I used a tall chevron pattern in a very light gray and then filled the top of the background with bright, hand-drawn flowers that make the colors pop. For the social media buttons, I just painted an uneven circle shape using my design program and Cintiq and drew the icons above in white. I even added a place to incorporate those black and white stripes I loved so much from the image I used for inspiration.

Step #7: Email Design Preview and wait for a response
No matter how much I love the design I came up with, I am ALWAYS nervous as I wait to hear back from each client. Waiting can be nerve-racking, but more times than not, the clients are very happy and excited when they see the direction I came up with for their design. 

Darlene was very excited and I received the email from her that every designer hopes to open... 
"YES!!" "Perfect!"

Darlene did not request any changes at this point and gave me the green light to start putting the test site together.

Step #8: The Test Site
I believe that providing a test site for each client is a vital part of my process. I want to make sure that the client can see the finished design as it will appear online before I upload the design to his/her blog. I do not expect that my clients have the ability to visualize what the design will look like online, so therefore, I provide visual communication with a test site. Once I have uploaded the design elements and coded the test site for the client, I email the client the test site.

Step #9: Final Revisions & New Blog Design Reveal
Once the client has had time to look at the test site, we discuss any minor changes that might need to be considered before the final design is completed. 

In this instance, Darlene wanted me to add a few books to the header and darken the gray colored text in the header as well. Those were both very minor changes that I was more than happy to do for her. Once those changes were made, I emailed her to let her know and waited for the final approval.

Step #10: Approval & Installing the New Design
Once Darlene approved the final changes, I sent her an email with a pre-made PDF of directions for her to follow in order to add me to her blog as an author. 

I will not use anyone's usernames or passwords, so I require that each client add me to their blog. 
Click the link below to see the PDF I send my clients... Feel free to use this PDF, but please make sure to link it to my site if you share it.


Once I accept the invitation and the client has changed my status to admin, I email the client to let her know when I will be accessing the blog. I try to always install the designs during low traffic times. I remain on the blog as an author for one week after I install the new design, just in case there are any kinks or links that need adjusting. Once the week is up, I remove myself and the client is free to enjoy the new design...

Here is Darlene's Before and After Images

Aside from a few links that need to be added to the navigation menu when Darlene is ready, the design is complete! I hope you take a moment to visit her blog
Thank you Darlene for trusting me to give your blog a new design!!


Some custom blog designs take me over 80 hours and others I am able to complete in less than 5. It just depends on the client, the design, and the amount of custom illustrations needed for a particular design. Although I did not include all of the boring details, I hope you all enjoyed getting a little peek into my process. 

Have a wonderful weekend everyone!!

Related Posts Plugin for WordPress, Blogger...